


Integrating with Zoho API: A Step-by-Step Guide
Explore Zoho's API with this guide. Learn to create apps, generate tokens, make API calls, and more with a helpful code example.


Introduction
Understanding and leveraging the power of APIs can unlock a world of possibilities for integrating various online services and platforms. One such platform, known for its comprehensive suite of business, collaboration, and productivity applications, is Zoho. However, while Zoho offers a wide range of products, one aspect that often stumps developers is its API authentication process. It’s the same across all Zoho products API, but it can be tricky to get right.
In this article, we’re going to demystify this process. I’ll take you through a step-by-step guide on how to integrate with the Zoho API, starting from creating an app to generating access tokens, and eventually making authorized API calls to Zoho services. What’s more, we’ll bring everything together with a practical code example that demonstrates a fail-safe approach to using the API.
By the end of this guide, you’ll know how to use Zoho’s services fully and fit them into your apps with ease.
Creating an app
To obtain this token, we need to create an app. To use APIs, users must authenticate the application and obtain an access token. This token allows the application to make API calls on behalf of the user. To get the access token, users need to first get a grant token, also known as an authorization code.
For this guide, we will focus on interacting with Zoho through our backend. When creating the app, select “Self Client” as the client type. While creating the app, we also need to specify the scope, which limits the actions that can be performed with the access token.
Refer to this documentation for instructions on creating the app. Set the time duration to 10 minutes so that there is enough time to generate the access token using the grant token provided.

Fig 1.0 — Example of scope definition
For the context of Zoho campaign the scope needed will be ZohoCampaigns.contact.CREATE-UPDATE See this link for more details on the scope needed.
Generating the grant token is a one-time process, provided you generate the access and refresh tokens within the time the grant token is valid for.
Generating access token
Now that we have the grant token let’s generate the access token. Note that the generated access token will expire after an hour.
Make an API call to this endpoint, replacing the query params values respectively.
POST: https://accounts.zoho.com/oauth/v2/token?grant_type=authorization_code&code=**THE_GRANT_TOKEN**&client_id=**YOUR_CLIENT_ID**&client_secret=**YOUR_CLIENT_SECRETE**
Example response:
{
    "access_token": "string",
    "refresh_token": "string",
    "api_domain": "https://www.zohoapis.com",
    "token_type": "Bearer",
    "expires_in": 3600
}
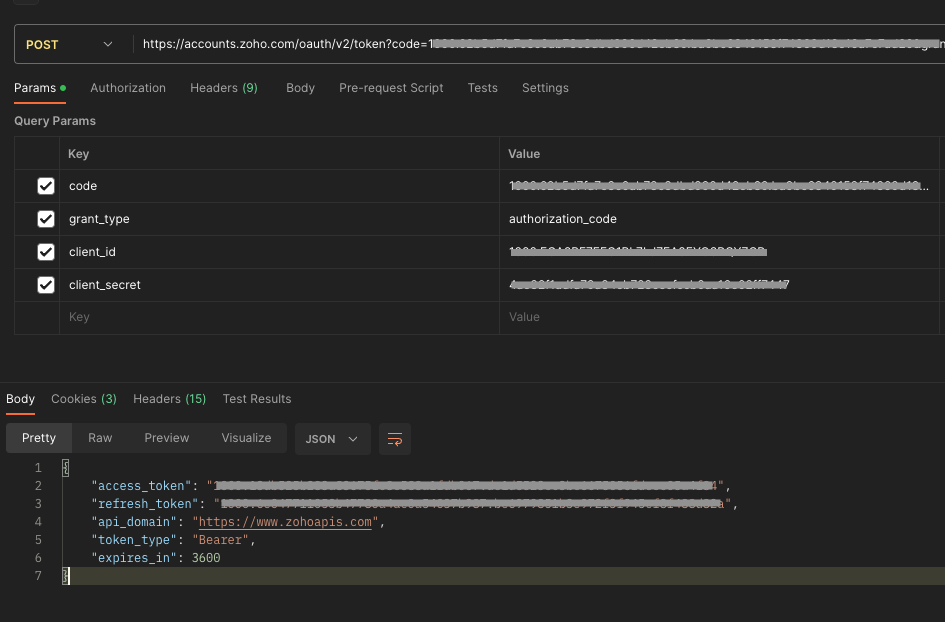
Fig 2.0 Example API call to generate an access token
Generating access token with the refresh token
Since the access token expires after an hour, you can generate a new one by calling the endpoint below.
Example Response:
{
    "access_token": "string",
    "api_domain": "https://www.zohoapis.com",
    "token_type": "Bearer",
    "expires_in": 3600
}
Making an authorized API call to a Zoho service
Although the authentication process remains consistent across all products, each product has its unique base URL. For example, the base URL for Zoho Desk is https://desk.zoho.com/api/v1, while for Zoho Campaign, it is https://campaigns.zoho.com/api/v1.1/. Thus, it is vital to refer to product-specific documentation when integrating.
Additionally, it is necessary to include the authentication token in the request header with the following format: Authorization: Zoho-oauthtoken THE_AUTH_TOKEN Ensure that there is a space between "Zoho-oauthtoken" and the actual token to ensure proper formatting.
Example Zoho API calls
Subscribing a user to the Zoho campaign via API
Request header: Authorization:Zoho-oauthtoken THE_AUTH_TOKEN
Creating a Zoho desk ticket via API
POST: https://desk.zoho.com/api/v1/tickets
Request header: Authorization:Zoho-oauthtoken THE_AUTH_TOKEN
Request Body:
{
  "contactId" : "1892000000042032",
  "subject" : "Real Time analysis Requirement",
  "dueDate" : "2016-06-21T16:16:16.000Z",
  "departmentId" : "1892000000006907",
  "channel" : "Email",
  "description" : "Hai This is Description",
  "language" : "English",
  "priority" : "High",
}
Code Example of the API integration
The provided code is a TypeScript file named “Zoho.ts” that utilizes the axios library and defines the necessary interfaces and classes for interacting with Zoho Desk.
A class called “Zoho” is exported, implementing the “ZohoInterface”. It contains properties for the access token and configuration, along with a constructor that initializes the configuration based on the provided parameters.
Additionally, there is a private method called refreshToken that uses axios to send a POST request to the Zoho token endpoint for refreshing the access token. Upon success, it updates the access token property.
To create a new ticket in Zoho Desk, the code provides a public method named createTicket. This method checks if the access token is set, and if not, it invokes the refreshToken method to obtain a new one. It then utilizes axios to make a POST request to the Zoho Desk API endpoint, including the necessary ticket details and authentication in the headers.
In case of a 401 error response, indicating an authentication failure, the code attempts to refresh the access token and retries creating the ticket.
Code Example of the API integration
The provided utilizes the axios library and defines the necessary interfaces and classes for interacting with Zoho Desk.
A class called “Zoho” is exported, implementing the “ZohoInterface”. It contains properties for the access token and configuration, along with a constructor that initializes the configuration based on the provided parameters.
Additionally, there is a private method called refreshToken that uses axios to send a POST request to the Zoho token endpoint for refreshing the access token. Upon success, it updates the access token property.
To create a new ticket in Zoho Desk, the code provides a public method named createTicket. This method checks if the access token is set, and if not, it invokes the refreshToken method to obtain a new one. It then utilizes axios to make a POST request to the Zoho Desk API endpoint, including the necessary ticket details and authentication in the headers.
In case of a 401 error response, indicating an authentication failure, the code attempts to refresh the access token and retries creating the ticket.
// ./Zoho.interface.ts
export default interface ZohoInterface {
  createTicket(payload: any): object
}
// ./Zoho.ts

// Import necessary libraries
import axios from 'axios'
import ZohoDeskInterface from './ZohoDesk.interface'

// Define interface for Zoho message content
interface ZohoMessage {
  email: string
  subject: string
  message: string
  firstName: string
  lastName: string
}

// Define Zoho class implementing ZohoInterface
export default class Zoho implements ZohoInterface {
  // Define properties for access token and config
  private accessToken = ''
  private readonly config = {}

  // Constructor that initializes the config based on provided parameters
  constructor(clientId: string, refreshToken: string, clientSecret: string) {
    this.config = {
      client_id: clientId, // The client ID obtained from Zoho
      refresh_token: refreshToken, // The refresh token obtained from Zoho
      client_secret: clientSecret, // The client secret obtained from Zoho
      grant_type: 'refresh_token', // Grant type for OAuth2
    }
  }

  // Method to refresh the access token
  private async refreshToken() {
    try {
      // Make a POST request to Zoho token endpoint to refresh the access token
      const { data } = await axios.post(
        'https://accounts.zoho.com/oauth/v2/token',
        {},
        {
          params: this.config,
        }
      )
      // Update the access token property with the new access token
      this.accessToken = `Zoho-oauthtoken ${data.access_token}`
      return true
    } catch (e) {
      // Capture the exception using Sentry
      Sentry.captureException(e)
      return false
    }
  }

  // Method to create a ticket in Zoho Desk
  public async createTicket(payload: ZohoMessage) {
    try {
      // Check if access token is not set, if not, refresh it
      if (this.accessToken.length === 0) await this.refreshToken()

      // Make a POST request to Zoho Desk API endpoint to create a ticket
      await axios.post(
        'https://desk.zoho.com/api/v1/tickets',
        {
          subject: payload.subject,
          description: payload.message,
          contact: {
            firstName: payload.firstName,
            lastName: payload.lastName,
            email: payload.email,
          }
        },
        {
          headers: {
            Authorization: this.accessToken,
          },
        }
      )
    } catch (e) {
      // Check if the error is due to authentication failure
      if (e?.response?.status === 401) {
        // Refresh the access token
        const isTokenRetrieved = await this.refreshToken()

        // Retry creating the ticket if the access token is successfully refreshed
        if (isTokenRetrieved) {
          await this.createTicket(payload)
        }
      }
      // Capture the exception using Sentry
      Sentry.captureException(e)
    }
  }
}
Conclusion
In this guide, we’ve learned how to work with Zoho’s API. Even though the steps to get the right access tokens seemed tricky at first, we’ve seen that it’s actually quite doable when broken down step by step. From making an app, to getting access tokens, to finally using the API, each step is important for a smooth setup with Zoho’s services.
The code example we went through makes this even easier by handling potential mistakes and making sure we can successfully use the Zoho API.
Whether you’re adding a user to a Zoho campaign or creating a ticket in Zoho Desk, you now have the know-how to boost your apps with Zoho’s many services.
If you found this guide helpful, please don’t forget to like and share it with others who might also benefit.
Happy coding, and until next time! ✌🏽
Links to further resources
Creating an APP — https://www.zoho.com/accounts/protocol/oauth-setup.html
Setting up Authentication(OAUTH) — https://desk.zoho.com/DeskAPIDocument#OauthTokens
Zoho Campaign API Docs — https://www.zoho.com/campaigns/help/developers/contact-subscribe.html
Zoho Desk API Docs — https://desk.zoho.com/DeskAPIDocument#Introduction